

Hydraulic disc brake. Photo: Wikimedia Commons
As cycling changes, so does cycling technology. The biggest change to road cycling in the last ten years is the use of disc brakes on road bikes. While road disc brakes are still making inroads into the professional peloton, they are present on most new road bikes at every level. Cyclocross bikes have been using cable-driven disc brakes, most road bikes now use hydraulic disc brakes that have greater power, but require more maintenance in general. Many experienced road cyclists understand use and maintenance of rim brakes and even replace their own. Although disc brakes are substantially more complicated in nature, replacement of brake pads is only slightly harder. In this article we will cover the types of disc brake pads available along with a step-by-step guide to replacing your own disc brake pads.
Disc Brake Pad Selection
While most mechanics will tell you to replace worn brake pads with like-kind, there are several aftermarket manufacturers which make replacement pads to fit any caliper type an size. We have used aftermarket replacement pads from both SwissStop and Kool Stop to replace the pads in our disc brake equipped mountain bikes and disc brake equipped road bikes. As we have personal experience with these pads, we will discuss the selections from these manufacturers in our discussion of brake pad selection.
Disc brake pads consist of a braking compound bound to a metal backing plate. There are two main types of disc brake pad compound materials : (1) sintered (metallic); and (2) organic (semi-metallic). Knowing the difference between the pad compound types and the qualities of each can make your pad selection easier based on your riding style and environmental conditions.
Sintered Pads
Sintered pad are made of a metallic braking compound bound to a metal backing plate. Some of the metal backing plates are aluminum, others are brass for increased heat conductivity. Sintered pads are the standard material that comes stock with both SRAM and Shimano systems. Sintered pads are better in wet weather than their organic counterparts. They also have a long life and the braking power does not reduce when the pads are hot (high heat resistance). However, sintered pads are very noisy and take a long time to bed in properly. The metal to metal contact between the pad material and the rotor creates a very reliable braking surface in all weather conditions, but in our experience the noise from the metal to metal contact became very annoying and we changed out otherwise serviceable sintered pads for organic pads.


Organic Pads
Organic pads are made of proprietary mix of organic materials that are blended and bound together using a resin and then bound to the metal backing. There are trace elements of metals in the organic pads as well, but much less than in the sintered, hence the name “semi-metalic” pads. The SwissStop organic pads consist of a mix of Kevlar, Ceramic and Brass materials. Organic pads provide excellent braking power along with better power modulation through the pull of the braking lever than sintered pads. Organic pads have consistent performance in both wet and dry conditions while maintaining excellent pad life. Once broken in, the noise in dry conditions is minimal except when the rotors and pads are very hot. There is some noise in wet conditions, but not as much as with sintered pads.


Other Mixes and Variants
In addition to the standard sintered and organic pads, aftermarket pad manufacturers have been attempting to improve on both sintered and organic compounds by making variants of each and revised backing plates that maximize braking power and consistency, increase pad life and reduce braking noise in all environments.
Brake pads with cooling fins are the one variant of the disc brake pad that attempts to reduce the temperature of the brake pad material and rotor by maximize the surface area of the backing plate. This is accomplished by adding a cooling fin heat sink (like on a computer chipset) to the backing plate. The cooling fin acts as an air-cooled radiator that dissipates heat from the brake pad material without transferring it to the rotor. Reducing the temperature of the rotor and pad material increases the braking power and modulation along with extending the life of the pad and rotor. One example of a brake pad with a heat sink is the Kool Stop Aero Kool pad.
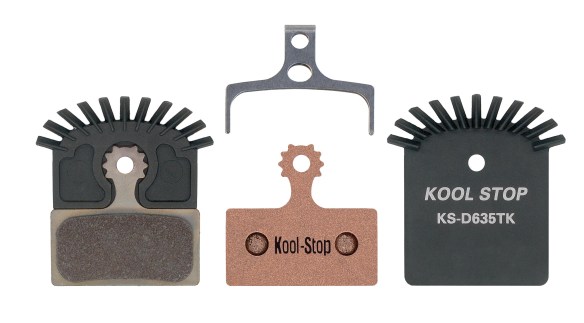
Kool Stop Aero Kool Pad with copper backing plate and add-on cooling fin
Another example of a brake pad with a cooling fin is the SwissStop EXOTherm2 pad. We are presently running the SwissStop EXOTherm2 pad on our road bikes and have had good success with keeping the brakes cool. However, they are a bit loud when stopping in either wet, or humid environments.

SwissStop has also made a variant of its organic pad compound with its Disc RS compound. The Disc RS compound remains organic, but seeks a balanced combination of brake performance, durability and incredibly low noise in all conditions. This is accomplished with a revision to their organic compound mix along with a reduction in the backing plate thickness that provides the preferred thermal characteristics, strength and stability of steel while reducing weight and increasing pad thickness. The Disc RS was debuted in August 2017, but we have not had the opportunity to test out these pads yet.
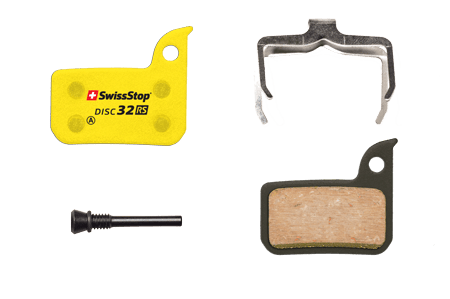
SwissStop Disc RS
Brake Pad Replacement Process
Once you’ve selected the brake pads that are right for your style of riding, then its time to install them. The process of replacing the brake pads is relatively simple, though a bit more complicated than for rim brakes. Follow these simple steps and the pad replacement process will go quickly. One thing to keep in mind is that hydraulic disc brakes require the lines to be bled at certain points in the life of the system, however, manufacturers (SRAM v Shimano v Campy) vary on how often you should bleed the hydraulic brake lines. This is a very involved process that should be performed by your mechanic at the proper maintenance point. Refer to your disc brake manufacturer’s instructions for the specific time frames.
WARNING: During the brake pad replacement process, DO NOT squeeze the brake lever unless you are using a pad spreader tool or until the wheel is back on the bicycle.
Step 1
Either attach your bike to a stand or flip it upside down and remove the first wheel. When removing the rear wheel, its best to shift the chain to the further outboard gears (largest chainring in the front and smallest cog on the cassette in the back). This allows for quick chain alignment when putting the wheel back in place.

Step 2
Remove the locking mechanism for the pads. This can either be in the form of a cotter pin or a locking clip and pad retention bolt.


Step 3
Remove the pads and spring (the metal part holding the pads in the caliper). The pads are removed toward the disc.


Step 4
Reset the caliper pistons to be in the fully retracted positions (flush with the caliper surface). This can be done with a plastic tire lever to avoid damaging the pistons.


Step 5
Install the new pads and spring followed by the cotter pin or pad retention bolt and locking clip.


Step 6
If you have a pad spreader tool, insert it between the pads and depress the brake lever to ensure the free movement of both pistons. If you don’t have a pad spreader tool, skip this step.
Step 7
Reinstall the wheel. If you skipped Step 6, depress the brake lever once the rotor is reinstalled and check for the free movement of the pistons. Rotate the wheel to ensure that neither pad is rubbing. If the pads are rubbing, continue to rotate the wheel and determine if the rotor needs adjustment or if the caliper adjustment needs modification. Once the pads are replaced, it’s time to go for a ride and bed in the new pads.
Brake Pad Bed In Process
One of the idiosyncrasies of disc brakes, as opposed to rim brakes, is the necessity to “bed in” the pads. Bedding in is the process of working the pad compound onto the rotor in order to maximize the braking power. Brake pad performance and noise can be affected by the bedding in process. Once a pad has been properly bed in it becomes more effective and less noisy in most conditions. The various types of pad compounds can be bedded in by using the following procedure recommended by SwissStop:
Step 1. On a gradual downhill slope, drag each brake for 20-30 seconds, alternating between front and rear. Repeat 2-3 times.
Step 2. On a steeper slope, engage and drag the brakes for 10-15 seconds then increase lever pressure until the bike slows almost to a complete stop. Repeat 2-3 times.
Pro Tip: The front pads will have been heated more than the rear. To achieve optimal performance, exchange the front and rear pads then repeat Step 2.
CAUTION before replacing or exchanging brake pads it is essential to let all parts cool.
After we installed new SwissStop organic pads on our hydraulic disc brake equipped road bikes, we followed this process for bedding in the pads. While the process took a couple of rides to complete due to the swapping of the pads, the stopping power was there quickly and the brakes are typically quiet other than when the rotors are hot.
More Information on Disc Brakes
For more information on disc brakes, see Bicycling Magazine’s The Beginner’s Guide to Disc Brakes.
